
Hair extension "How 2's: Dye, Wash & Care"

Dyeing Hair extensions
When Dyeing hair extensions, people get scared, thinking there going to ruin them, but dont worry it is as simple as dyeing your own hair. the only difference is that we have a scalp, so sometimes we use a massaging type motion scrunching our hair into our head to make sure your roots are getting dyed in the process, the same goes for washing our hair. well that is the only thing you dont do to extensions unless you want a big ball of knots at the end of the process.
Dyeing:
1: Gravity, dye the extensions in a down ward motion a tinting brush may help with this, laying them on a flat surface like the floor or table with a plastic bag underneath or newspaper so you dont ruin your table/floor. NEVER go upwards from there hair or scrunch.


Shampoo
2:When Shampooing unfortunatly some friction is recuired for the shampoo to take effect and bubble up, and for this with out usual hair we scrunch, rub and massage it into our scalp with the hair, well this is were it gets tricky, because you do need to scrunch at this point but i will show you how to do it without getting it into a big knot.

Conditioner
3: this part is easy, it just going through the extensions with your fingers, un-knotting them in the process, but even with this you can pull out alot of hair but there is a simple way of doing this without brushing the hair out with your fingers ( again with a downward motion )

What you do is grab the hair with all four fingers and then with your thumb while going down push your thumb in to the hair and this will comb your hair through with the conditioner without using all fingers and taking out hair in the process.
Aftercare & Drying
4:Use a heat deffence spray before drying and i also like to use a frizz control spray, as hair extensions seem to get frizzy after washing them especially at the ends. I then brush them through. After all that i usually hold the hair dryer inbetween my legs while cross legged ( weird i know ) but i dont have another pair of hands unfortunately while doing this i hold the hair extensions while the hair dryer's blowing and brush them every now and again because a blow dryer can also make them knotty.

I hoped that helped and if you have any questions on were i bought any of the items or a question on the tutorial then please comment below :)
xxxxxxxxxxxxxxxxxxxxxxxxxxxxxxxxxxxxxxxxxxxxxxxxxxxxxxxxxxxxxxxxxxxx
xxxxxxxxxxxxxxxxxxxxxxxxxxxxxxxxxxxxxxxxxxxxxxxxxxxxxxx
Lips Tips & Tricks
5 Different Lip Colour Methods

In this post i am going to share some of my Lip Techniques. i am going to show you it is not as simple as just applying your favourite lipstick, there are so many ways you can apply lip colour, there are so many lip products out there nowadays, lipstick, liptint, lipgloss, lip tar, lip liners, lip Stain. but im about to show you all you need is a bit of know how, some imagination and being experimental.
Lip Care

Most people know about exfoliation and Lip balm's so im not gonna explain everything, but i will say giving your lips that extra bit of care really does give your lips that extra something especially when applying any sort of lip colour, gives it that extra staying power and makes your lipstick look flawless. i use Blistex Relief Cream, its used for chapped lips, cold sores and cracked lips, i always put this on before make up and before i go to bed at night, the next morning my lips always feel so soft.
Before applying any lip colour or lipstick i like to apply concealer on my lips, i feel it gives the colour a little extra pop of colour , it also helps the colour stay on for longer.
3D Nude Lip's

For this i used a nude Lipstick with a sorta peach undertone colour to it. this lipstick is Miss Sporty 021 Spiced Rum. and for the lip liner i actually used MUA's Eyebrow pencil in Blonde, i know it sounds weird but this pencil has such a creamy feel and i love the colour match with this lipstick, you can use any sort of pencil really be it eyebrow or eyeliner pencil.

Yes i know it just looks like i have eaten too much chocolate, but bere with me. with the pencil fill in the outside edges of your mouth, doing this gives you lips definition.

After apply you lipstick like you normally would and you should have perfect 3D lips, here is another picture

Ombre Pink Lips

If you normally follow my blog you already know i rage on about constance and carrol Lipsticks, and how much i love them. this is Shade 362 Passion Pink & Shade 202 Pure Pink.

I know its Messy but that dosnt matter right now as you are going to blend them together anyway. the same technique as the 3D lips but you fill the outer corners completely, you do this with your darker shade of pink.

Apply the lighter shade of pink in the middle.

Blend it all together and this is the result you should get.
Grape Lip Liner & Gloss

For this i used Revlon Liner, i cant remember the name or number as my dog had chewed the bottom and Jack Wills Lipgloss.

I know it looks grey but in real life it is a dark grape/ wine colour. Fill in the lips with your pencil.

Apply the Gloss and this is what it should look like.
Here are some more pictures.

Glitter Lips / Loose Eyeshadow

for these two looks i used Constance & Carroll Shade 202 Pure Pink.
the first one it with Lime Crime's Zodiac Glitter on top
the picture below using the same lipstick but with Sugarpill's Magentric Loose Eyeshadow on top


Red Velvet Lips


.jpg)
And the best thing about this look it makes your teeth look really white, my favorite look of the bunch :)
Which one was your favorite ?
if you have any questions or would like to know were i purchased any of the products then please comment me below :) xxxxxxxxxxxxxxxxxx
!!!!!!!!!!!!!!!!!!!!!!!!!!!!!!!!!!!!!!!!!!!!!!!!!!!!!!!!!!!!!!!!!!!!!!!!!!!!!!!!!!!!!!!!!!!!!!!!!!!!!!!!!!!!!!!!!!!!!!!!!!!!!!!!!!!!!
St Patrick's Day Look:
Green & Gold Eyes with Rainbow Brows & Green Lipstick
Tutorial

!!!!!!!!!!!!!!!!!!!!!!!!!!!!!!!!!!!!!!!!!!!!!!!!!!!!!!!!!!!!!!!!!!!!!!!!!!!!!!!!!!!!!!!!!!!!!!!!!!!!!!!!!!!!!!!!!!!!!!!!!!!!!!!!!!!!!!!!!!!!!!
Hair Colour's, Tips, Tricks and Reviews
Hair Colour's

I love changing my hair colour, i cannot go a couple of months at least changing the colour, style or cut. but doing so can damage or ruin your hair. as you can see by the pictures there is not one colour i have not had my hair ( maybe orange but im working on that ). on this post i am going to tell you the best hair remedy's, quick fixes, reversing the effects of colour, condition, best hair dyes and what to steer clear of.
Hair Dyes

La Riche Direction's & Crazy Color
i know there is lots of hair dyes like these like Manic Panic and Special Effects but as i have ever used these two brands i can only recommend these. Directions seem to have a better and more colorful range but as in longevity and value for money i have to say crazy color is defiantly better. and i will show you why :)
Pictures of Pinkissimo Crazy Color outcome on Bleached Hair

its quite a vibrant pink and quite neon. but mixed with conditioner you get this outcome..

so what im trying to say is DONT buy light pastel colours because if you buy a darker version of what you want you get sooo much more product when mixed with conditioner to make it the shade you want. i have another example of blue
Directions Lagoon Blue over Bleached hair ( sorry for over exposed roots)

and here it is mixed with conditioner and added pink

soo in future if you want pastel hair or even just a lighter shade of a colour you already had... then rather spend loads of money on buying that lighter shade and dying your hair every week.. just experiment.. remember coloured dyes like this is like paint and your hair a canvas so dont be affraid to make colours lighter, mix two different colours or even create somthing amazing. for example here i have mixed Crazy Colours Pinkissimo Directions Spring Green and Lagoon Blue :)
x Rainbow x

Bleach & Peroxide Vs Boxed Hair Dyes

Once upon a time i used to dye my hair with boxed hair dyes as i couldn't really afford to go hairdressers every time i wanted a change and it was easy enough and cheap enough to buy them. but i had realised my hair not only felt crap and dry but some of my hair had burnt off NOT ON THE SCALP i mean i had noticed some of my hair was really short in some places not noticeable but in some cases it had made some of my hair around 1 inch long on top of my head, at that point i thought there must be a better way. im not saying boxed hair dyes are bad but if you dramatically change your hair as much as mine and use alot of bleach then maybe its not for you as it wasnt for me. now i have naturally very dark hair i mean brown going on black hair.. so if your thinking of bleaching your hair but scared of the repacutions then follow this guide as my hair is fine and i have never once burnt my hair off.
now i buy Cream peroxide and mix it with powdered bleach some people prefer a toner but thats also fine. i use cream peroxide vol 30 .. i would not recommend going any higher than that if you are using it on your scalp as vol 40 will burn your scalp, but vol 40 would be fine doing highlights or dip dye.
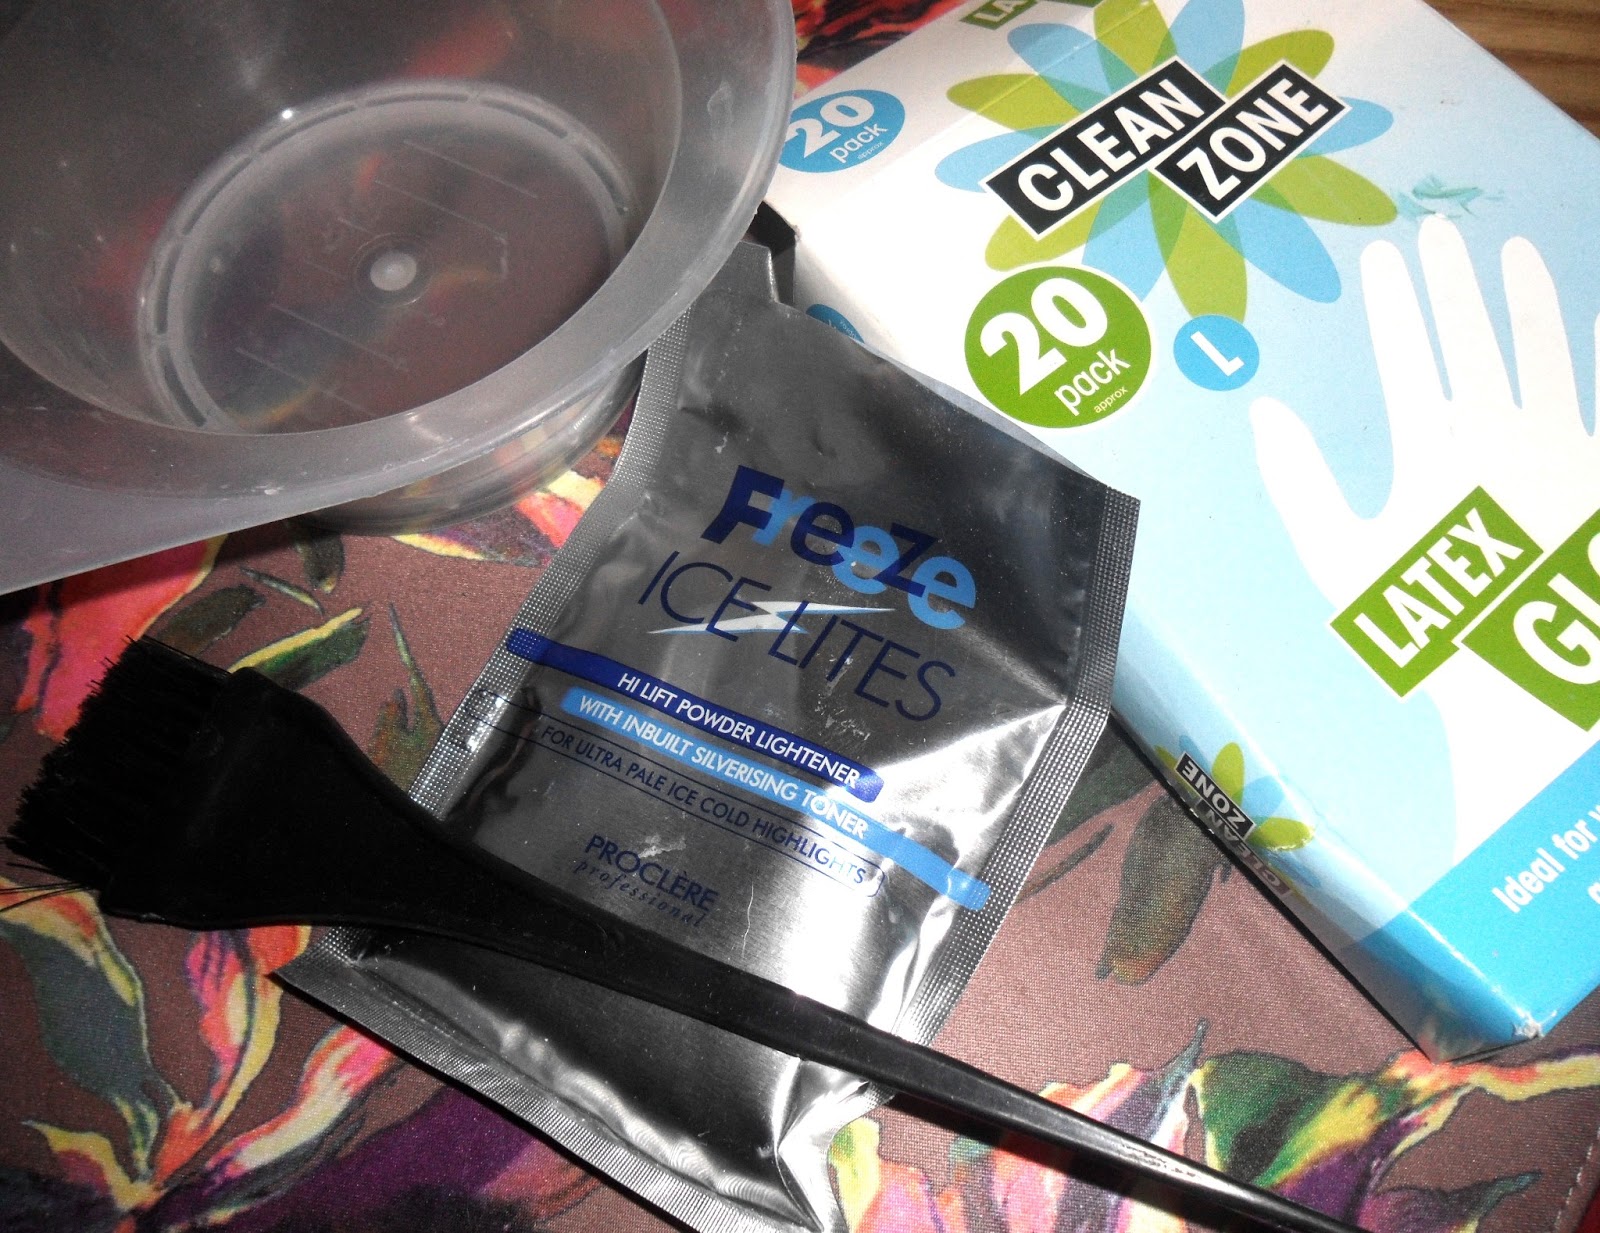
i use Freeze ice lights powdered Bleach as its blue it takes all of that yellowy tone out of your hair for perfect platinum blonde. Mixing is easy just take you peroxide and mix with the powdered bleach to the same consistency of what you would expect of a boxed hair dye not too gloopy and powdery or not too much creame peroxide so its basically as thick as water. you need a nice consistency you will also need a PLASTIC bowl not ceramic as it will crack. you will also need a tinting brush and latex glove as you dont want bleach on your hands.
the reason i prefer this method as not only i get better results but it dosnt damage my hair as much and compared to the box brand the smell of ammonia is alot less, so you dont seem to gag or have the need to open a window with this method.
if you have any questions about were i purchased any of the stuff or any queries or concerns than please feel free to ask in the comment section below xxxx
Hair Care

Conditioner
My all time Favourite brand of conditioner is Aussie. my favorite being 3 minute miracle re-constructor it really does make your hair feel soo good even after heavy bleaching. i dont think i will ever stop buying it i also buy other conditioners but this one is always on my bathroom side. another great conditioner is Lee Stafford's Hair Growth Treatment, which is nice as a treat as its a bit more expensive but works wonders to damaged hair.

Heat Defence

I like to use this heat defense by schwarzkopf as it protects your hair up to 220C and as my hair straighteners go up to 230C its the best iv found to suit my needs so far and plus it smells really nice :) x
Shampoo's

I use Tressemme as its really cheap for the amount you get i think i go through about 1 bottle every 2-3 months. its also a colour fade one as my hair colours washes out quite alot. the other being LOreal Homme Purple shampoo its ment for grey hair but its used to take brassy and yellow tones out of hair which i use when dying my hair blonde. its great for platinum/ silver blonde hair.
Reversing the Effects of Hair dye

If you dyed your hair a dark colour and wanted go lighter without bleach then Colour B4 is a great way. i have used this one before and even though it does make your hair feel really not great afterwards and it pongs a bit it is a great way to compleatly wash your hair of all the previous colours and have a fresh start. another great way of washing out Temporary hair dyes like crazy colour is (yes i know it sounds weird) but lemon washing up liquid it really does strip all the colour. when i wanted a lighter coloured pink it was easy because i washed my hair nearly everyday so eventually my hair did go a lighter pink but my hair extensions were still a bright neon pink so i soaked them overnight with lemon washing up liquid and it really does work.
so thats it for my tips tricks and reviews on hair if you have any questions than please feel free to comment below :) xxxxxxxxxxxxxxxxxxxxxxxxxxxxxxxxxxxxxxxx
!!!!!!!!!!!!!!!!!!!!!!!!!!!!!!!!!!!!!!!!!!!!!!!!!!!!!!!!!!!!!!!!!!!!!!!!!!!!!!!!!!!!!!!!!!!!!!!!!!!!!!!!!!!!!!!!!!!!!!!!!!!!!!!!!!!!!!!!!!
How to Get Perfect Flawless Skin
3 Simple Steps
Prime & Moisturize
Contour & Highlight
Powder & Set

First of i would like to start off by saying i dont have perfect skin i have the odd red patch, freckles and blemishes. when i do my make up pictures i dont use Photoshop the only time i use Photoshop is to maybe get rid of the odd hair out of place and i rarely do that half the time.
what im trying to say is you dont need Photoshop or £50 skin care routine just some know how.
i would like to point out this tutorial is for flawless skin and requires alot, i would not recommend this for the summer, an everyday thing or for work, its just for those days were you're skin dosnt look that great or maybe for a night out, so when and if any photos are taken you will look your utmost glamorous x
Step 1: Moisturize & Prime

Applying Primer & Moisturizer
For some People its just moisturize but nowadays everyone seems to rage on about primer to make your make up stay in place. i have used primers in the past and to be honest i dont really notice much difference, but i stumbled upon this the other week and noticed it was a moisturizer and primer in one, so i thought why not.and at £3.99 you cant go wrong.
(by the way i paid £3.99 for this in SAVERS Beware its £5 everywhere else)
when applied it does have the same quality as a primer and feels really nice too, whether it makes your make up stay in place or not, it defiantly make my skin feel good, before and after removing my make up.
Brushes & Sponges

Now you dont necessarily have to use brushes some people prefer sponges or even their fingers, there's nothing wrong with that as there are some things best left to the finger tips.
as you can see i have a foundation brush on the far left, a powder brush in the middle and a contour brush. now the next instructions when i say pick * up and use that just use your initiative .
Foundation's

i have two Foundation Max Factor 3 in 1 , which i use as my main foundation 'Light Ivory' and Max Factor Experience Weightless foundation in a couple of shades darker than my natural skin tone 'Beige Linen'.
(the darker one may be same brand but different type this is because i feel this one is less dry and easier to blend)
i use the darker one to contour some people may prefer to use a bronzer but i dont particuley like bronzer and i feel this method works so much better.
Step 2: Contour & Highlight

(Note: i know this is not me but i tried to take a picture and it didnt come out as well as i would of liked it so heres a picture of the exact same routine as mine)
After applying your Foundation which matches you're skin tone add with the darker foundation use this as you're contour( the darker bits) for the smaller parts of contouring use you're contour brush.
( if you use bronzer powder than ignore the contour bit for now, this is for liquid base make up only)
for the Highlight (white bits) use your favorite Concealer, i normally use my fingers for concealer. it may not be white like the picture but oh well. my favorite concealer is NYX Concealer in a jar.
After applying your foundation and you're contour and Highlight Blend together with your Foundation Brush, try not to use the brush or sponge for the highlight because you have the chance to sweep it all away i feel a patting type motion with your fingers is the best way to blend concealer.

Step 3: Powder and Set
After it is all blended together add a translucent Powder or a Compact, i use MUA Matte perfect Loose Powder as it was cheap and it does the job fine. £2.30 Superdrug.
Then Apply Blush
if you use Powder Bronzer now is the time to use it after applying and setting you're make up with a translucent powder add your bronzer like the picture above where the darker areas are. and Remember less is more!
if you have any questions or queries about this tutorial then please feel free to comment me xxxxx
!!!!!!!!!!!!!!!!!!!!!!!!!!!!!!!!!!!!!!!!!!!!!!!!!!!!!!!!!!!!!!!!!!!!!!!!!!!!!!!!!!!!!!!!!!!!!!!!!!!!!!!!!!!!!!!!!!!!!!!!!!!!!!!!!!!!!!!!
Pastel Hair Tutorial
I decided after having pink hair to go white and what turned out as an experiment came out so amazing it is defiantly the best hair colour iv had yet.
i am telling you how to do this not just for the hairstyle but on tips on how to save money when bleaching and without destroying your hair in the process i am naturally very, VERY dark and if i can get my hair white with it still attached to the roots then so can you.
before deciding to do it your self take a look at these pictures and decide whether its for you.. Happy Bleaching xx
.jpg)
sorry for the lack of make-up lol xx
closer look on the violet and pink
closer look on the violet and pink

First shampoo your hair a day before Dont condition! and preferably not an oily shampoo.
Now to get that white which is soo hard to achieve and expensive here is the answer!
First you need to buy blue powdered bleach you can get this at any hair specialist stores such as Sally's : http://www.sallyexpress.com/ or Ultimate H&B http://www.ultimatehb.co.uk/
These stores are located in the uk.
Now the bleach i like to buy is Freeze ice Lites this is blue powdered bleach now the key in the fact that it is blue is that blue and purple colours lift out brassy and yellow'y tones in your hair. where as regular bleach dosnt do that due to people countlessly dyeing their hair and damaging it ( like me!).
This is what it should look like.

The 50g pack varys from £3 to £4 and the 400g is £20 upwards
it is well worth getting the 50g pack as i made the mistake thinking it was enough for just one use were as one pack lasts me 3 months on dying my roots.
next you will need some creme peroxide 30 VOL
The most you would need to spend on this is round about £4 to £6. Dont make the mistake and buy the most expensive brand the all have the same ingredients and consistency when going in the store ask them for their own brand of this it all does the same job.
I got mine for £4 which i think was a bargain considering its lasted me about two years.
Make sure you get 30VOL NO HIGHER!
The Freeze ice Lites pack does say to get 40VOL but you have to remember it is actually ment for highlights not for your scalp if you put 40VOL on your head it would burn your scalp so make sure you dont make that boo boo!
Once you have them you need a tinting bowl and brush now a brush really helps but you could use a plastic bowl insted NOT CERAMIC! as the bleach will make it crack and then you would have a broken bowl and a whole lot of mess!
i got a set of brushes and a bowl for just 99p ( not each all together ) at discout uk stores and im pretty sure they would sell anything similar in similar stores i wouldnt get one from a proffesional hair store as you would be paying a whole lot more.
Once you have the three main things bleach, peroxide & bowl you now need to mix the contents.
Now dont get scared because when i first done this the women at the store gave me no help and i had to figure it for myself. to be quite honest theres no real science behind it
no measurements or amounts you pour about quarter of the small bleach packet into your bowl (i use quarter because thats what i use everyones different and has different lengths of hair) after you have done that mix in the peroxide no specific amount if you have used home bleaching kits at home you know the consistency of hair dye try and aim for that and remember if you add a little too much creme peroxide you can always add a little more powder to counter it out and vice versa.
Dye your hair how you usually dye your hair i would recommend roots first the the rest because that way the roots get more attention (as the roots are generally darker than the rest of hair)
Leave it in for around 30 minutes and wash out with shampoo only dry hair and it usually takes another go.
when dying it the second time you dont have to be so consistent just quick and simple. Dye the ginger/ blonde parts more thoroughly as im sure there will be bits darker than the rest.
After doing that get your Blue/ Purple Shampoo i would buy Lee Stafford Bleach Blondes Shampoo http://www.boots.com/en/Lee-Stafford-Bleach-Blondes-Shampoo-250ml_853905/ or Loreal proffesional homme grey shampoo http://www.gorgeousshop.co.uk/shop/l-oreal-all-products-1704/l-oreal-professionnel-homme-grey-shampoo-250ml-3656.html
I would buy the loreal as it is very good and worth the money and you can generally get it from your local hairdresser.

Now heres the part for the pastels if you just want white hair then just wash and rinse with this and apply to roots and leave on for 20 minutes. now if you want the violet streaks literally wash your hair with this shampoo with as less water as you can you dont want blue water dripping everywhere. then get either a swimming hat or plastic bag and put over your head (Not completely over so you cant breath just around your hair line) and tye it at the back. leave this in for as long as you can i left mine for about an hour if you can do more than do so.
Wash out and you should have violet streaks this happens because not all the hair is a certain pigment so the violet only seems to stay on the end in a streaky manner very clever :)
Now for the pastel pink you need to buy Crazy Colours Pinkissimo and Direction's Toner.
Wash out and you should have violet streaks this happens because not all the hair is a certain pigment so the violet only seems to stay on the end in a streaky manner very clever :)
Now for the pastel pink you need to buy Crazy Colours Pinkissimo and Direction's Toner.

Next mix pinkissimo and lots of conditioner you will only need a blob of the pink. also mix in a bit of the toner now the toner isnt all necessary but if you want just white hair then use this with these instructions minus the pink.
Now i tell you to get pinkissimo rather than a lighter pink dye because you can make it lighter yourself by mixing in conditioner and it will last you a hell of lot longer.
Next after you've mixed it all together so its a very very light pink like near whitey sort of pink apply the mixture to your roots or any were else you want the pink, dosnt have to be exact all the way through you could add more pink in certain areas.
Wash out after 20 to 30 minutes.....
The conditioner i would recommend you use because you have bleached your hair your hair needs a little treat so i would recommend Aussie 3 minute miracle hair normally £3 to £4 from savers or superdrug reconstructor or Lee stafford's hair growth treatment £7.99 from boots
Hiya hun I cud do with some advice on my hair a have died dark brown hair need t lift my ends to do a dip dye... What wud b the best solution without damaging my hair hun xxx
ReplyDeleteCheap human hair bundles I am impressed. I don't think Ive met anyone who knows as much about this subject as you do. You are truly well informed and very intelligent. You wrote something that people could understand and made the subject intriguing for everyone. Really, great blog you have got here.
ReplyDelete